#Others
[Newbie Guide 104] Worker in-depth Guide
Mar 11, 2020, 17:29 (UTC+8)
3247
11
59
0
Last Edited on : Mar 15, 2020 (UTC+8)
# 1
N-No time to t-talk….!
No time to st-stutter!
I want to be re-reborn as a giant.
I w-wanna be Human too!
T-too much work!
Too much work. Not gonna do it.
I’m scared of Santo Manzi
Black Desert Online has a slave monopoly. These slaves are composed of different kinds of workers. These workers were scattered working around the vast continents and in some of its archipelagic islands. Why some? It is because not all islands have a node for resources. If you notice there are some injustices about how some master deals with his/her workers. That is why you could find some slaves who were running from their masters. In my assumption, this system has a part 2 but I don’t know when would be the update. I hope that you will also be a good master to your constituents that they will not run away not just here in this virtual world but also in the real-world as well. Give them food at least (and let them rest as well). If you ask me why? I live this virtual reality into a real-life experience. Since I’m a Seventh Day Adventist and I will be always resting during the seventh day of the week then I also let my workers go to rest. I'm not here enforcing my belief or opinion but I'm just opening a certain idea that could benefit the society as well. I hope that you will not misquote my standpoint.
As a newbie maybe you would like to ask what is the purpose of these workers? How could I start the so-called slave empire? “Slave Empire” was a viral term of lifeskillers and for some who love grinding. Remember not all veterans in grinding know this.
| What Do You Need To Prepare |
|
- Energy - Lodging - Silvers - Contribution Points |
|
Kinds of Workers |
|
Goblins –fast speed class workers Humans – middle speed class workers Giants – slow speed class workers Papu’s – fast speed class workers Fadus – in between middle and slow speed classes (list will be updated) |
| Grades of Workers |
|
There are five grades of workers which are: |
| Worker's Food |
|
Each started task would deplete one point of your worker's stamina. Therefore if you do it continuously, they will be tired, and your workers won't work either. So, you need food to restore their stamina. These are: 1. Beer 2. Cheese Pie 3. Freekeh Snake Stew 3. Fish Filet Chip 4. Grilled Bird Meat 5. Oatmeal |
|
Author's Note: Beer is the easiest food that you could cook. Though it is a drink in real life here in BDO it is considered as food. Press F2 to search for its ingredients. |
| Buying a lodging |
|
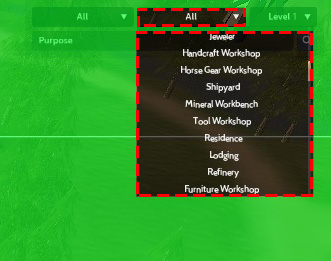
In order to hire a worker we need to buy a lodging. These lodging is their home. Wherein they will feel secured. Buying lodging is the same as buying a residence. But to minimize your time spent on finding it, just do it this way. 1. Press M and click the region you want to put your worker. Thus, if you want to get resources in calpheon region then you must buy lodging in that area to maximize the benefits and minimize the cost as well. 2. In the search bar type “Lodging.” Remember to capitalize each first letter when you type in that search bar. The search bar is case sensitive. Or find Lodging in the dropdown menu.
3. There would be blue arrows if you do it correctly. Click one of the houses pointed by the blue arrows and you will be directed to a purchase menu.
4. Click purchase and click yes or press enter. You will need to wait a minute/s depending on the level of the lodging to finish the purchase.
5. If you buy a higher level of Lodging don’t forget to max level it to use its full potential. Just click “Level Up” until you could see this sentence “This is the maximum level” and all arrows would be filled in by an orange color. |


| Finding a Work Supervisor |
|
On the left side part of your map, you could find a magnifying glass which has an alt tag of "Find NPC". Click that and TYPE “work supervisor.” Click your desired supervisor and then autopath would come out. To autopath just press “T.” You could also click the worker icon.
|


| Named Worker's Lists |
|
This is just partial information since this forum is not capable of handling 4 columns at a time. Instead, I will put a hyperlink in each NPC's name for you to check the location. |
|
NPC |
Inherent Skill Reform speed +5 Node Work speed +5 Node Work Speed +5 Node Work Speed +5 Refinery work speed +5 Refinery work speed +5 Tool production speed +5 Tool production speed +5 Mass production speed +5 Mass production speed +5 Mass production speed +5 Polishing workshop speed +5 Furniture production speed +5 Refinery specialty work speed +5 Refinery specialty work speed +5 Cannon/Siege weapon production speed +5 Cannon/Siege weapon production speed +5 Ship/Carriage/Horse gear production speed +5 Ship/Carriage/Horse gear production speed +5 Ship/Carriage/Horse gear production speed +5 Additional processing (+2) when making a crop crate Additional processing (+2) when making a crop crate Additional processing (+2) when making an ore crate Additional processing (+2) when making a timber crate Additional processing (+2) when making a mineral crate Gives a low chance of returning 100% of 1 crafting material Gives a low chance of returning 100% of 1 crafting material Gives a low chance of returning 100% of 1 crafting material |
9
122
Lv 61
MeisterBlank
Last Edited on : Mar 15, 2020 (UTC+8)
# 2
| Methods of Hiring a workers |
|
1. Random Contract Method 2. Amity Contract Method 3. Exchange Contract Method |
| Random Contract Method - Random Rolling |
|
The random rolling contract method needs a lot of energy. So you must have a huge amount of energy pool to get an artisan worker. However, if you only have below 100, still you could do it. You will contract the worker through random rolls, which means RNG is involved.
1. Find a work supervisor. Kindly refer to the Finding a Work Supervisor tab. 2. When you reach the destination, interact with the NPC by pressing “R,” and you could find this menu. Click the contract worker or press 1, and you will be prompted by a notice box that addresses that it cost 5 energy to hire a worker together with your energy pool count. Click Yes if you want to view the worker and to start hiring. If you click yes it doesn't mean you hire the worker immediately. It only means that you will view what you have rolled.
3. Then the Workers of the Day menu will show up.
The menu consists of the following: Workers information, your available lodging, Current Stamina, and how much cost to hire that worker. In the bottom part you could see three options to: [1] view continuously, [2] view another or [3] to hire that worker.
When clicking the View Another button, you will be prompted again by a yes or no notice box, which also displays the energy cost to select a worker, and at the same time, your energy pool.
Clicking the view continuously button would lead to another menu, which will give you two categorical options, and these are the following: Worker's grade, wherein you could choose from normal to artisan.
|


|
Amity Contract Method - Named Worker |
|
This style of contract needs a lot of energy. It is because you need to hire that named worker through amity, who is in front of you. Shall we say what you see is what you get? This type of worker has an equivalent of professional grade. But they can't be promoted, but they would level up to 30. These workers have a special ability e.g Bravant which has (+2) processing of mineral crates. To hire them, you need to play an amity game. Kindly read the author's note. So here's how to do it. 1. Find the named worker that suits your needs. Refer to the list and use the finding a worker supervisor guide to find the named worker. 2. Interact the Named NPC and you will notice that there are only 3 options available in the menu it is because you don't have enough amity to open it.
3. Since you can’t access the special shop, you need to do the amity game. Refer to any amity game guides (this system is much complicated, it will take time for me to do it now). Don’t wave at the NPC, that is a bad choice.
4. While doing this method, if you don't have enough interest, much better find it first or don't do it either. At least 75 percent of the knowledge of interest is recommended.
|
|
Author's Note: In doing an amity game you must consider these following: You need to watchout the following: 1. The employment contract of named workers cannot be used in other towns/cities. Of course, these workers could work anywhere as long as the nodes were connected from the parent node. Therefore, even if you go to valencia and use the bravant contract it will always refer to TRENT it is because they are bound to their parent node.
|


 5. Once you meet the requirements, the employment tab would open. Click it or press 1. Then a shop window would appear.
 6. Buy it and use it, but make sure you have a lodged in that specific node. Since this type of worker is bounded by their parent node.
|
Exchange Contract Method - Buying a Contract |
|
This method was rarely used because there wasn't any third party slave broker/trader in the BDO community. This means that no player monopolizes a slave market and you could only see a few in the market and most all the time the market is empty. This means there is a huge demand in this kind of marketplace. I will let FAQ section to answer the issue. So, how to do it? 1. Go to any nearest worker supervisor. Refer to finding a worker supervisor tab. 2. Click worker exchange or press 2.
3. Choose the desired worker then press buy and accept the purchase confirmation. Make sure you have silvers in your inventory or your storage.
|
|
Authors Opinion: In doing this kind of method always check the worker's status. If you want to buy skilled one make sure that the promotion count is not zero. Every 10 levels of your workers there would be 1 promotion point thus, a level 30 worker must have at least 3 promotion points. Each promotion would cost 1 promotion point. Every failure as well would cost 1 promotion point. Therefore if you have a level 30 worker with zero promotion points then that worker would be stuck in that grade. |


| Finding worker's interface |
|
There are many methods on how to view the workers interface. And these are:
Method 1 - UI Clicking Method
Just Press "Control" and click the pick axe icon in your screen.
Method 2 - Game Menu Method
Method 3 - Map Method
Method 4 - Hotkey
This requires some setups. First, open your settings. ESC press the gear icon. Next, click interface Then, under that interface tab select UI Hotkeys Lastly, find worker list in the right side window and put on some hotkey of your choice. In my case I put Num(dot). Don't forget to apply your settings. After this you could open your worker's list through hotkey.
|

 Press "ESC" Button and navigate and click the Life tab. Under it, click the Worker's List. For a combined of shortcut keys: Press ESC + F6 + 4 simultaneuosly.
  You could also open the workers management interface thorugh opening the map interface. Just click the pickaxe icon and the interface will pop up.
| Workers Interface - Managing your workers |
|
The workers UI were composed of so many tools to manage your workers correctly. I put number as labels to better illustrate the UI clearly. 1. That function serves as how many workers you have already. 73 workers are just minimum since I don't even touch the crate trading because when we say empire its almost anything. 2. Generally those two buttons are tabs to switch between worker's status and promotion information. 3. Those are Filters. The left side is for workers of each cities and towns and the right side is for workers grade. 4. Workers single interface which include the following: a. button to feed the selected worker. b. button to fire the selected worker. c. button to stop the repeated work d. button to reset worker's skill e. hovering this area will lead you to a description box. The description box contains the following: I. Worker's stats Experience - every task that your worker could finish gives him an experience. These experiences will lead him to level up and to get more skills. Work speed - gives the exact measurement of how fast your worker could work. Movement Speed - determines how fast your workers can run to and from the working node. Luck - increases the chances of looting good items in some nodes such as trace, etc. Stamina - how long your worker could work on the task that you give. II. Worker's Skills f. worker's stamina status g. name of the node where a worker is working h. Worker's level and grade i. button to stop the job queue, at the same if you're worker is in idle mode that button will turn into a repeat button, which will make the worker repeat the last work assignment. j.status of how much time left and how many jobs were queueing, and at the same time what resources your worker is gathering. 5, Recover all button is to feed all your workers. Make sure you have enough food in your inventory. 6. Repeat all is a button that will repeat all jobs and at the same time its job queues. |

9
122
Lv 61
MeisterBlank
Last Edited on : Mar 16, 2020 (UTC+8)
# 3
| Worker's Skill |
| For advanced users, skill is a very important thing. Each worker has different sets of skills. Each grade has a set Tier of skills as well. Though worker's skill is the most complicated part of this guide, I will try my best to explain everything I've learned from my seven months of playing as a lifeskiller using the slave empire method. |
| Skill Type |
Available in Grade and below |
Skills Explanation |
| Adv. [Type] Production skill | Artisan | +1-3 production skill |
| Adv. [Type] Packing Skill | Artisan | +1-3 packing skill |
| [Type] Production Skill | Professional | +1-2 production skill |
| [type] Packing Skill | Professional | +1-2 packing skill |
| [Type] Knowledge | Naive | +5 workspeed |
| Craftsmanship | Skilled | +0.2 work speed when leveling up |
| Leg Work | Skilled | +0.5 movement speed every level |
| Lucky Guy A | Skilled | +1.0 luck |
| Lucky Guy B | Normal | +0.7 luck |
| Lucky Guy C | Naive | +0.4 luck |
| Wings A | Skilled | +11% movement speed |
| Wings B | Normal | +8 movement speed |
| Wings C | Naive | +6 movement speed |
| Quick A | Skilled | +10% work speed |
| Quick B | Normal | +7% work speed |
| Quick C | Naive | +5% work speed |
| Simple A | Skilled | +2.0 work speed |
| Simple B | Normal | +1.5 work speed |
| Simple C | Naive | +1.0 work speed |
| Thrifty A* | Skilled | +10% chance of returning 10% of 1 material during crafting |
| Thrifty B* | Normal | +7% chance of returning 10% of 1 material during crafting |
| Thrifty C* | Naive | +5% chance of returning 10% of 1 material during crafting |
| Work Supervisor A | Skilled | +3 work speed |
| Work Supervisor B | Normal | +2 work speed |
| Work Supervisor C | Naive | +1 work speed |
| Blessed Hand | Skilled | +0.2 luck when leveling up |
| Masterly Skill | Skilled | +2 work speed |
| Adept Skill | Skilled | +2 work speed +7% movement speed |
| Worker's Usage |
|
A wise player would maximize his/her earning through the worker's stats. Thus workers vary from others as well. From node workers through farmers these workers vary their talents. These are some popular usage of the workers. |
9
122
Lv 61
MeisterBlank
Last Edited on : Mar 18, 2020 (UTC+8)
# 4
Frequently ASK Questions
|
Are these workers necessary? |
| Yes, in a means of passive income. No, if you want to focus on some aspects of the game like if you love grinding and if you don’t like AFK. |
|
If I closed my BDO game client, do my node workers will still be working continously? |
|
No, your workers will work only when your account is active. But there's a loophole they will finish the started work but not the queue. Thank you Supporter Ibarra and Supporter Florentino for the reminders. I forgot to mention it. |
| Why does the travel time multiplied by 2? |
|
It is because he needs to bring home those resources that he collected from the node. If you want to know more visit this page. |
| Does it mean that if the workers had a +3 productions/packing, he processed the recources into 1:3 ratio? |
| No, the +3 packing/production skills work this way. If you have a worker with a skill like this, you still need to put a 1:1 ratio of resources. However, that worker will finish his work in a 1:3 ratio. It means, instead of working 3x, he will only work it in 1 time. Thus you conserved 2 beers for his work. |
9
122
Lv 61
MeisterBlank
Last Edited on : Mar 15, 2020 (UTC+8)
# 5
I encourage you to ask some questions and I will answer it in the FAQ section of the guide.
***Reserved for Changelog.
9
122
Lv 61
MeisterBlank
Last Edited on : Mar 12, 2020 (UTC+8)
# 6


Workers still work even if you are offline in Banking.
You need to put this in your guide.
190
229
Lv 62
LionessSpark
Last Edited on : Mar 18, 2020 (UTC+8)
# 7
Thank you Spark.. I add it in the FAQ section of the guide. Thank you very much for your reminders.
9
122
Lv 61
MeisterBlank
Last Edited on : Apr 1, 2020 (UTC+8)
# 8
Congratulations on being top ten ❤
10
84
Lv 62
Digitalwaifu
Last Edited on : Apr 1, 2020 (UTC+8)
# 9
Congratulations on being selected as Top 10, @Cyberdasm! Keep up the great work!

107
470
Lv 62
Florentino

Reply


